It started the way most comfort meals do—standing in the kitchen at 11:45 a.m., fridge door open, hunger rising, and a strong craving for something warm, cheesy, and slightly nostalgic. You know that moment when a sandwich just feels too… uninspired? That was me. But then I remembered the one meal that always, always delivers: a tuna melt.
But not just any tuna melt. This one had capers. This one had horseradish. This one had sourdough so buttery and crisp it could moonlight as a croissant. And once I made it, I realized something: the humble tuna melt is the best thing you’ve forgotten about.
And now I’m here to help you remember. If you’re searching for the best tuna melt sandwich recipe, something that’s easy, cheesy, and made in a skillet, this is the one. Let’s get into it.
Why the Tuna Melt Deserves a Comeback
Let’s be real—tuna gets a bad rap. Somewhere between sad office lunches and questionable cafeteria trays, we forgot what canned tuna could be. But when you mix it with creamy mayo, a little tang, a hit of spice, and sandwich it between toasted bread and melted cheese? It transforms.
A tuna melt is grilled cheese that went to college. It’s savory, melty, and delivers on every single level—texture, temperature, taste. It’s also budget-friendly, pantry-stable, and lightning fast to make. Basically, it’s your lunch soulmate.
This recipe brings in the big hitters: high-protein lunch ideas, quick skillet meals, and even cheap gourmet sandwich recipes.
The Ingredients That Take This From Basic to Brilliant
Here’s what I use to build the ultimate tuna melt—and how you can tweak it to your taste.
| Ingredient | Why It Works | Swaps or Extras |
|---|---|---|
| Canned Tuna | The heart of the melt | Albacore preferred; packed in water |
| Duke’s Mayo | Creamy richness with a tangy kick | Any mayo works, but Duke’s reigns supreme |
| Horseradish | Adds zip and heat | Dijon mustard or hot sauce |
| Sweet Relish | Balances the salty fish | Pickle juice, chopped gherkins |
| Capers | Briny, bold, and unexpected | Olives, or skip if you’re not a fan |
| Green Onion | Mild bite + freshness | Chives, red onion |
| Worcestershire Sauce | Umami depth | Soy sauce or anchovy paste (tiny amount) |
| Salt & Pepper | Brings it together | Always to taste |
| Sourdough Bread | Holds up to the melt and adds flavor | Rye, whole wheat, or white bread |
| Butter (Kerrygold!) | Golden crust with rich flavor | Margarine or olive oil, if needed |
| Parmesan, Mozzarella, Cheddar | A trio of meltiness and sharpness | Use what you love or what’s in the fridge |
How to Build the Perfect Tuna Melt
Step 1: Drain and Flake the Tuna Like You Mean It
Start with good-quality canned tuna (albacore in water is ideal). Drain it well—like squeeze-it-with-a-fork kind of well. You want dry flakes that soak up the good stuff, not soggy fish soup.
Break it up in a bowl and let it breathe. This is tuna therapy.
Step 2: Mix the Filling to Taste, Not Just Technique
To the tuna, add:
- 2 heaping tablespoons of mayo
- 1 tablespoon of sweet relish
- 1 tablespoon of capers (no juice!)
- 1–2 teaspoons of horseradish
- 1 tablespoon Worcestershire sauce
- ¼ cup chopped green onion
- Salt and pepper to taste
Stir it all up until it looks like something your sandwich would want to wear. Taste and tweak as needed. Don’t skip the taste test. It’s your moment of power.
“Tuna salad should never be shy. It should punch, pucker, and melt in your mouth.” — Sandwich philosophy
Step 3: Butter the Bread Like You’re Painting a Masterpiece
Grab thick-cut sourdough. You want slices that can hold their shape and still soak up butter. Spread softened butter generously on one side of each slice. Don’t just dab—treat it like a skincare routine. Full coverage.
Step 4: Toast, Flip, and Strategically Layer
Heat your skillet over medium. Place two slices of buttered bread face-down in the pan and toast until golden brown. This is your inside layer. It’s your insurance policy against sogginess.
Now flip those slices and start building:
- Sprinkle Parmesan on the toasted side first (it sticks like glue)
- Spoon on a generous layer of your tuna mixture
- Add mozzarella and cheddar on top of that
- Place the second slice on top, toasted-side in
You’ve now built a cheese fortress. Let it toast and flip carefully once the bottom is golden.
Step 5: The Final Melt Moment
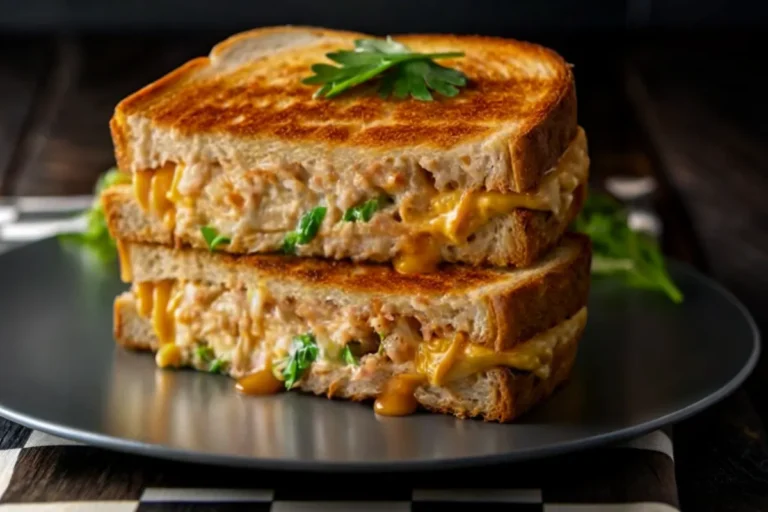
Once both sides are crisped to golden perfection and the cheese is visibly oozing, remove from heat and let it rest for a minute. Just one. It’ll still be melty, but you’ll avoid burning your tongue (I say this from experience).
Then slice it in half—corner to corner, obviously. You’re not a monster.
5 Reasons the Tuna Melt Still Wins Every Time
- It’s nostalgic. Feels like a diner lunch in the comfort of home.
- It’s flexible. Add veggies, switch the bread, tweak the cheese.
- It’s fast. From fridge to plate in under 20 minutes.
- It’s comforting. Creamy, crunchy, warm, salty—what more do you want?
- It’s unexpectedly fancy. Capers and horseradish take it to dinner party status.
Cultural Deep Dive: The History of the Tuna Melt
Believe it or not, the tuna melt likely originated sometime in the 1960s, around the golden age of American diner culture. Someone probably dropped tuna salad onto a grilled cheese and said, “Let’s go with it.”
It gained traction fast—tuna was affordable, shelf-stable, and wartime familiar. Throw in cheddar cheese, white bread, and a flat-top griddle, and boom: a comfort classic was born.
Tuna melts are one of the few foods that have transcended generations, always riding that sweet spot between lunch nostalgia and savory indulgence.
Global Twists on the Classic Tuna Melt
If you’re feeling creative (or bored with tradition), here are some international spins worth trying:
| Country | Tuna Melt Twist |
|---|---|
| Japan | Add wasabi mayo and a sprinkle of furikake |
| France | Use baguette + Dijon + Gruyère cheese |
| Mexico | Add chipotle crema + pepper jack |
| Italy | Sub tomato confit + fresh basil + provolone |
| India | Mix tuna with curry mayo + onion chutney |
What to Serve With a Tuna Melt (Besides Applause)
| Side Dish | Why It Works |
|---|---|
| Tomato Soup | Classic pairing—dip, bite, repeat |
| Dill Pickle Spears | Tangy crunch to cut the richness |
| Potato Chips | Adds that salty crunch |
| Coleslaw | Sweet and acidic contrast |
| Sparkling Water or Iced Tea | To balance the richness of the melt |
3 Mistakes to Avoid With Tuna Melts
- Soggy bread. Toast the inside before layering—it makes a world of difference.
- Underseasoning. Tuna can taste bland if you’re not generous with herbs, acid, and salt.
- Using only one cheese. You need meltiness and flavor—mix it up.
Storage and Leftovers (If That Ever Happens)
Let’s be honest, there are rarely leftovers. But in case:
- Tuna mix: Store covered in the fridge for 3–4 days.
- Pre-assembled sandwiches: Can be wrapped and frozen before cooking.
- Reheat: Skillet > microwave. Keeps the crust crispy and the cheese dreamy.
The Unexpected Star: Capers
Let’s talk about the MVP you didn’t see coming: capers. These briny little orbs add a salty, lemony punch that cuts through the mayo and cheese like a chef’s knife through soft butter.
I tried them once and now I can’t stop. If you’ve never added capers to tuna salad, please consider this your official nudge.
“Capers are the surprise plot twist your tuna melt didn’t know it needed.” — Me, forever changed
Final Thoughts: Tuna Melts Are a Hug in Sandwich Form
If you’re someone who’s ever stood in front of your pantry, defeated and hungry, this sandwich is for you.
It’s what happens when low-effort meets high-reward. It’s rich and crispy and creamy and bold. It’s cheap, fast, and deeply satisfying. It makes leftovers feel like a win and lunch feel like an event.
And when you bite into that golden, buttery bread and the cheese pulls like a commercial? That’s when you’ll understand why this isn’t just a sandwich.
It’s therapy. With capers.
So go ahead. Butter that bread. Pile it high. Press it down in the pan like it owes you money. And toast your way to greatness—because tuna melts are back, baby. And this time, they’re not playing around.


